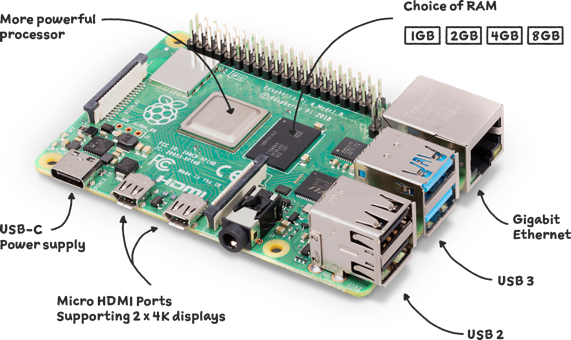
I recently got my hands on a Raspberry Pi and I’m interested in running Windows 11 on it. I’m aware that installing a full desktop OS like Windows 11 on an SBC (Single Board Computer) can be challenging due to hardware limitations. Has anyone successfully installed Windows 11 on a Raspberry Pi or a similar board computer? If so, what steps did you follow, and what specific tools or configurations did you use to get it running smoothly? Any tips on optimizing performance or overcoming common issues would be greatly appreciated!
1 Answer
Introduction to Installing Windows 11 on Raspberry Pi
Installing Windows 11 on a Raspberry Pi or similar Single Board Computer (SBC) can be an exciting project, especially for tech enthusiasts looking to explore the capabilities of these compact devices. While Windows 11 is designed for more powerful hardware, there are ways to run it on a Raspberry Pi, typically through unofficial means. In this guide, we will explore the steps, tools, and configurations required to successfully install Windows 11 on a Raspberry Pi, along with tips for optimizing performance and troubleshooting common issues.
Prerequisites for Installation
Before diving into the installation process, ensure that you have the following prerequisites:
- Raspberry Pi Model: Ideally, you should have a Raspberry Pi 4 with at least 4GB of RAM. The more RAM, the better the performance when running Windows 11.
- Micro SD Card: A high-quality micro SD card (at least 16GB, but 32GB or more is recommended) is essential for storing the operating system.
- Power Supply: Use a reliable power supply that can provide sufficient power to your Raspberry Pi, especially if you are using peripherals.
- Keyboard and Mouse: You will need these for the initial setup and configuration of Windows 11.
- Monitor: A monitor or display that can connect to your Raspberry Pi to visualize the installation process.
- Windows 11 Image: You will need a compatible Windows 11 image file. This can be a version specifically modified for ARM architecture.
- Rufus or Balena Etcher: Software for creating bootable drives from the Windows 11 image.
Downloading the Windows 11 Image
Finding a compatible Windows 11 image for the Raspberry Pi is crucial. Since Microsoft does not officially support Windows 11 on Raspberry Pi, you will need to rely on community builds. Here are the steps to download the image:
- Visit a reputable forum or website that specializes in Raspberry Pi projects, such as the Raspberry Pi subreddit or the Windows on Raspberry project.
- Look for a pre-built Windows 11 image designed for ARM architecture. Make sure to verify the integrity of the download (e.g., using checksums) to ensure it is not corrupted.
- Download the image file to your computer. It will usually be in a compressed format (like ZIP or RAR).
- Extract the image file from the compressed folder.
Creating a Bootable SD Card
Once you have the Windows 11 image, the next step is to create a bootable SD card. Here’s how to do it using Rufus or Balena Etcher:
- Using Rufus:
- Insert your micro SD card into your computer.
- Open Rufus. It should automatically detect the SD card.
- Select the Windows 11 image file you downloaded.
- Choose the partition scheme (GPT is recommended for Raspberry Pi).
- Click on the ‘Start’ button to create the bootable SD card.
- Using Balena Etcher:
- Open Balena Etcher.
- Select the Windows 11 image file.
- Select the target SD card.
- Click on ‘Flash!’ to begin the process.
After the process is complete, safely eject the SD card from your computer.
Booting Windows 11 on Raspberry Pi
With your bootable SD card ready, it’s time to boot your Raspberry Pi:
- Insert the SD card into the Raspberry Pi.
- Connect the keyboard, mouse, and monitor to the Raspberry Pi.
- Power on the Raspberry Pi. It should automatically boot from the SD card.
- Follow the on-screen prompts to complete the Windows 11 setup. This may include setting up a Microsoft account and choosing your preferences.
Note that the first boot may take longer than usual as it configures the system. Be patient during this process.
Optimizing Performance and Overcoming Common Issues
Running Windows 11 on a Raspberry Pi can come with performance challenges due to hardware limitations. Here are some tips to optimize performance and troubleshoot common issues:
- Disable Visual Effects: For better performance, navigate to the System Properties and disable unnecessary visual effects. This can help speed up the overall experience.
- Use Lightweight Apps: Opt for lightweight applications rather than resource-heavy ones. For instance, consider using a lightweight browser instead of a full-fledged Chrome installation.
- Increase Swap Space: If you experience slowdowns, consider increasing the swap space to allow the system to use more virtual memory.
- Update Drivers: Ensure that all drivers are updated to the latest versions compatible with your build of Windows 11. This can help with hardware compatibility and performance.
- Check for Overheating: Raspberry Pi can heat up during heavy usage. Ensure proper ventilation and consider using heat sinks or fans to mitigate overheating.
- Common Issues:
- If Windows fails to boot, check the integrity of the SD card and the image file.
- If you encounter performance issues, consider reverting to a lighter operating system or using Windows 10, which may offer better compatibility.
Conclusion
Installing Windows 11 on a Raspberry Pi or similar SBC is a challenging yet rewarding project that showcases the versatility of these devices. While it may not provide the same experience as running Windows 11 on a traditional PC, it opens up new possibilities for experimentation and learning. By following the steps outlined in this guide and applying the optimization tips, you can successfully run Windows 11 on your Raspberry Pi. As always, be sure to back up your data and proceed with caution, as unofficial installations may lead to system instability.