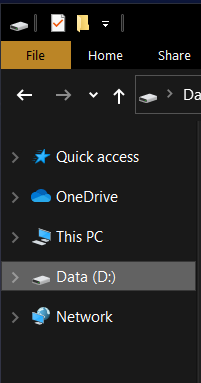
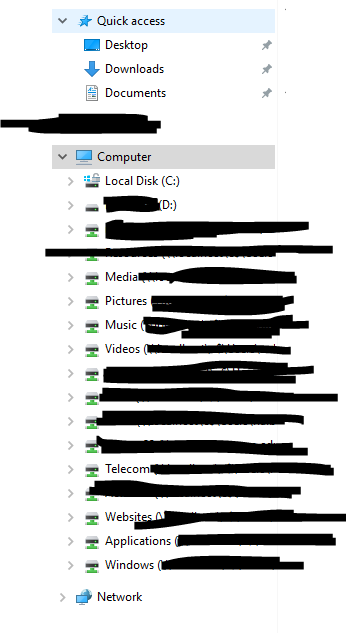
I am trying to configure my computer’s system drive settings, but I am having trouble with the drive letters. Currently, my system drives are listed as A:, B:, and D:. I need to either remove D: from the list or add C: to it. Is it possible to do either of these things?

3 Answers
Introduction
Drive letters are an essential aspect of the Windows operating system as they help users identify and access different storage devices connected to their computer. However, sometimes users may encounter issues with the drive letters, such as the need to remove or add a drive letter. In this blog post, we will discuss whether it is possible to remove D: or add C: from File Explorer and how to do it.
Understanding Drive Letters
Before delving into how to remove or add a drive letter, it is crucial to understand what drive letters are and how they work. In Windows, drive letters are assigned to storage devices, such as hard drives, solid-state drives, USB drives, and optical drives. These letters range from A to Z, with A and B reserved for floppy disk drives, while C is typically assigned to the primary hard drive that contains the operating system.
Drive letters make it easy for users to identify and access different storage devices connected to their computer. For instance, if you have two hard drives, one with the letter C and the other with the letter D, you can easily differentiate and access them using File Explorer.
Removing a Drive Letter from File Explorer
If you want to remove a drive letter from File Explorer, you can do so using the Disk Management utility. Here are the steps to follow:
1. Press the Windows key + X on your keyboard to open the Power User menu.
2. Click on Disk Management to open the utility.
3. Locate the drive letter you want to remove and right-click on it.
4. Select Change Drive Letter and Paths from the context menu.
5. In the next window, click on the Remove button.
6. Click Yes to confirm that you want to remove the drive letter.
7. Close the Disk Management utility.
Once you complete these steps, the drive letter will no longer be visible in File Explorer. However, note that the data on the drive will remain intact, and you can still access it by using the drive’s path or another letter assigned to it.
Adding a Drive Letter to File Explorer
If you want to add a drive letter to File Explorer, you can also use the Disk Management utility. Here are the steps to follow:
1. Press the Windows key + X on your keyboard to open the Power User menu.
2. Click on Disk Management to open the utility.
3. Locate the unassigned space on the hard drive you want to add a drive letter to.
4. Right-click on the unassigned space and select New Simple Volume.
5. Follow the prompts in the New Simple Volume Wizard to assign a drive letter to the volume.
6. Click Finish to complete the process.
Once you complete these steps, the drive letter will be visible in File Explorer, and you can access the files stored on the drive.
Changing Drive Letters in File Explorer
If you want to change the drive letter of a storage device in File Explorer, you can also use the Disk Management utility. Here are the steps to follow:
1. Press the Windows key + X on your keyboard to open the Power User menu.
2. Click on Disk Management to open the utility.
3. Locate the drive whose letter you want to change.
4. Right-click on the drive and select Change Drive Letter and Paths.
5. In the next window, click on the Change button.
6. Select a new drive letter from the dropdown menu and click OK.
7. Click Yes to confirm that you want to change the drive letter.
8. Close the Disk Management utility.
Once you complete these steps, the drive letter will be changed in File Explorer, and you can access the files stored on the drive using the new letter assigned to it.
Conclusion
In conclusion, removing or adding a drive letter in File Explorer is possible using the Disk Management utility in Windows. Whether you want to remove a drive letter, add a new one, or change the letter of an existing drive, the Disk Management tool provides a simple way to do it. However, it is essential to exercise caution when working with drive letters to avoid accidentally deleting or modifying important files on your computer.
It is possible to change the drive letter of a specific drive, including removing it or adding a new one. However, it is not recommended to change the drive letter of the system drive (C:) as it can cause system errors or make the operating system unbootable.
To change the drive letter, you can use the Disk Management tool in Windows. This can be accessed by typing “diskmgmt.msc” in the Run dialog box (Windows + R) or by searching for it in the Control Panel. In the Disk Management window, you can right-click on the drive you want to change and select “Change Drive Letter and Paths.” From there, you can assign a new letter or remove the existing one.
It’s important to be careful when working with drive letter changes, as it could cause data loss or make the system unbootable if done incorrectly. If you are not confident in making these changes, it is recommended to consult with a professional or backup your data before proceeding.
Well, here is how you can remove D:
I actually find this annoying, and so I’ve hidden the extra drives so they don’t show up at all. This prevents flash drives from showing up twice, but it should hide all extra drives from showing up except nested under This PC.
I don’t remember where I got this from, but you can use a Registry Script to quickly edit the registry to hide those extra drives:
Windows Registry Editor Version 5.00

[-HKEY_LOCAL_MACHINE\SOFTWARE\Microsoft\Windows\CurrentVersion\Explorer\Desktop\NameSpace\DelegateFolders\{F5FB2C77-0E2F-4A16-A381-3E560C68BC83}]

[-HKEY_LOCAL_MACHINE\SOFTWARE\WOW6432Node\Microsoft\Windows\CurrentVersion\Explorer\Desktop\NameSpace\DelegateFolders\{F5FB2C77-0E2F-4A16-A381-3E560C68BC83}]
Save the above as RemoveDrives.reg and right-click and click Merge. I don’t believe it needs to be run as administrator, but if it doesn’t work the first time, try that.
Once you restart File Explorer, the extra drives should no longer be visible.
This reverts File Explorer to the Windows 7 behavior where drives only showed up nested under Computer and not anywhere else, in my opinion the more sensible behavior.
Here is a screenshot from my PC when I plug in a USB flash drive. Notice it doesn’t show up by itself in the Navigation pane – only once under This PC:
