The Search feature on my Windows 10 operating system has unexpectedly stopped functioning. Whenever I attempt to use it by clicking on the Search icon or typing in the Start menu, a blank search window appears.

I have attempted to resolve the issue by rebuilding the index, running the SFC /scannow command, performing a DISM Restore, and even creating a new local user account, but none of these solutions have been successful.
This issue is occurring on Windows 10 version 1909 build 18363.592.
3 Answers
Possible Causes of the Search Menu Not Working on Windows 10
The search feature on Windows 10 is an essential tool that enables users to locate files, applications, and settings on their computer easily. When this feature suddenly stops working, it can be frustrating and could affect productivity. There are several reasons why the search menu on Windows 10 may stop working. In this section, we will discuss some of the possible causes of this issue.
Corrupt Windows Search Index
One of the primary reasons why the search menu on Windows 10 may stop working is due to a corrupt Windows Search Index. The search index is a database that stores information about the files and folders on your computer. When you perform a search, Windows uses this index to quickly find the files or folders you are looking for. If the search index becomes corrupted, it can cause the search feature to stop working correctly.
Windows Search Service Not Running
Another reason why the search menu may not be working on Windows 10 is if the Windows Search Service is not running. The Windows Search Service is responsible for creating and maintaining the search index. If this service is not running, the search feature will not work correctly.
Outdated or Corrupt Drivers
Outdated or corrupt drivers can also cause the search menu on Windows 10 to stop working. Drivers are software components that allow hardware devices to communicate with your computer’s operating system. If the drivers for your computer’s hardware components are outdated or corrupt, it can cause various issues, including problems with the search feature.
Third-Party Antivirus Software
Third-party antivirus software can also cause the search menu on Windows 10 to stop working. Antivirus software is designed to protect your computer from malicious software, but sometimes it can interfere with other programs on your computer, including the search feature.
Windows Update Issues
Windows updates are essential for keeping your computer up to date with the latest security patches and bug fixes. However, sometimes these updates can cause issues with your computer’s functionality, including problems with the search feature.
How to Fix the Search Menu Not Working on Windows 10
Now that we have discussed some of the possible causes of the search menu not working on Windows 10, let’s look at some solutions to fix the issue.
Rebuild the Search Index
If the search index is corrupt, rebuilding it can help fix the search feature. To rebuild the search index, follow these steps:
1. Click on the Start menu and type “Indexing Options” in the search box.
2. Click on “Indexing Options” from the search results.
3. In the Indexing Options window, click on the “Advanced” button.
4. In the Advanced Options window, click on the “Rebuild” button.
5. Wait for the search index to rebuild.
Restart the Windows Search Service
If the Windows Search Service is not running, restarting it can help fix the search feature. To restart the Windows Search Service, follow these steps:
1. Press the Windows key + R to open the Run dialog box.
2. Type “services.msc” in the Run dialog box and press Enter.
3. In the Services window, scroll down to find “Windows Search.”
4. Right-click on “Windows Search” and select “Restart.”
Update or Reinstall Drivers
If outdated or corrupt drivers are causing the search menu to stop working, updating or reinstalling them can help fix the issue. To update or reinstall drivers, follow these steps:
1. Press the Windows key + X and select “Device Manager.”
2. In the Device Manager window, expand the category of the device you want to update or reinstall.
3. Right-click on the device and select “Update driver” or “Uninstall device.”
4. If you select “Update driver,” follow the on-screen instructions to update the driver. If you select “Uninstall device,” restart your computer, and Windows will automatically reinstall the driver.
Disable Third-Party Antivirus Software
If third-party antivirus software is causing the search menu to stop working, disabling it temporarily can help fix the issue. To disable third-party antivirus software, follow these steps:
1. Click on the Start menu and type “Security” in the search box.
2. Click on “Windows Security” from the search results.
3. In the Windows Security window, click on “Virus & threat protection.”
4. Click on “Manage settings” under “Virus & threat protection settings.”
5. Toggle off the switch under “Real-time protection.”
Perform a Windows Update Troubleshoot
If Windows updates are causing the search menu to stop working, performing a Windows Update troubleshoot can help fix the issue. To perform a Windows Update troubleshoot, follow these steps:
1. Click on the Start menu and type “Troubleshoot” in the search box.
2. Click on “Troubleshoot” from the search results.
3. In the Troubleshoot window, click on “Windows Update” under “Get up and running.”
4. Click on “Run the troubleshooter” and follow the on-screen instructions.
Conclusion
The search menu on Windows 10 is an essential tool that enables users to locate files, applications, and settings on their computer easily. When this feature suddenly stops working, it can be frustrating and could affect productivity. In this post, we have discussed some of the possible causes of the search menu not working on Windows 10 and provided some solutions to fix the issue. If none of these solutions work, you may need to contact Microsoft support for further assistance.
It’s possible that the issue you’re experiencing is caused by a problem with the Windows Search service. This service is responsible for indexing files and folders on your computer, as well as providing search results when you use the search function in Windows.
Here are some additional steps you can try to troubleshoot and fix the issue:
- Restart the Windows Search service:
- Press the Windows key + R to open the Run dialog.
- Type “services.msc” and press Enter.
- Scroll down the list of services and find the “Windows Search” service.
- Right-click on the service and select “Restart”.
- Check for updates:
- Open the Start menu and type “check for updates”.
- Click on the “Check for updates” result to open the Windows Update settings.
- Check for and install any available updates.
- Reset the Search index:
- Press the Windows key + R to open the Run dialog.
- Type “control.exe /name Microsoft.IndexingOptions” and press Enter.
- In the Indexing Options window, click the “Advanced” button.
- Click the “Rebuild” button.
- Reset the Windows Search feature:
- Press the Windows key + R to open the Run dialog.
- Type “powershell” and press Enter.
- In the PowerShell window, type the following command and press Enter: Get-AppXPackage -AllUsers | Foreach {Add-AppxPackage -DisableDevelopmentMode -Register “$($_.InstallLocation)\AppXManifest.xml”}
This will reset the Windows Search feature, which may fix any issues you’re experiencing.
- Create a new user account:
- Press the Windows key + R to open the Run dialog.
- Type “control.exe /name Microsoft.UserAccounts” and press Enter.
- In the User Accounts window, click the “Manage another account” link.
- Click the “Add a new user in PC settings” link.
- Follow the prompts to create a new user account.
If none of these steps help, it’s possible that the issue is caused by a problem with the system files on your computer. In this case, you may need to perform a repair install of Windows to fix the issue.
The issue was caused by a temporary malfunction on Microsoft’s server, but it has now been fixed. After restarting the affected systems, they should work normally.
We are aware of a temporary server-side issue causing Windows search to show a blank box. This issue has been resolved for most users and in some cases, you might need to restart your device. We are working diligently to fully resolve the issue and will provide an update once resolved.
This issue was resolved at 12:00 PM PST. If you are still experiencing issues, please restart your device. In rare cases, you may need to manually end the SearchUI.exe or SearchApp.exe process via Task Manager. (To locate these processes, select CTRL + Shift + Esc then select the Details tab.)
– source
The issue appeared to be connected to specific features in the search menu that rely on online connectivity, such as Bing Search and Cortana. By turning off these features, the other features in the search menu were able to operate once more.
Here are the instructions on how to deactivate Bing Search and Cortana in the search menu.
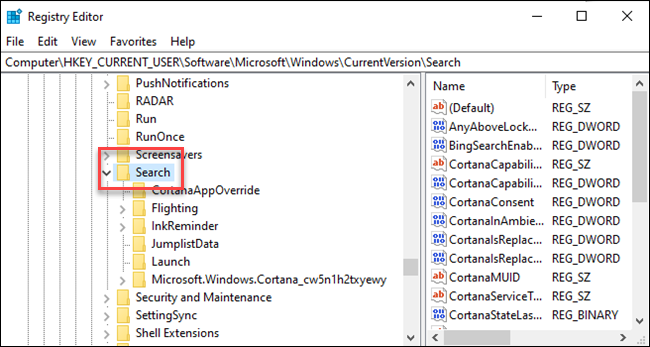
- Open Regedit and navigate to
HKEY_CURRENT_USER\SOFTWARE\Microsoft\Windows\CurrentVersion\Search

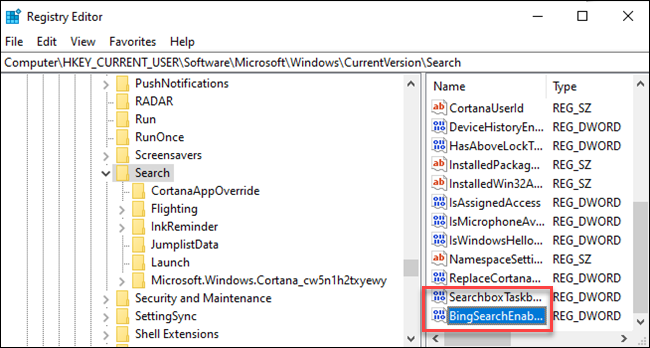
2. Right-click the Search icon and choose New > DWORD (32-bit) Value. Name the new value BingSearchEnabled

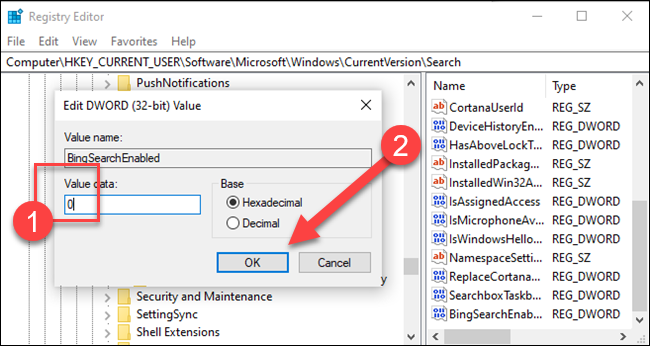
3. Double-click the new BingSearchEnabled value to open its properties dialog. The number in the “Value data” box should already be 0—just ensure it’s still 0. Click OK to continue

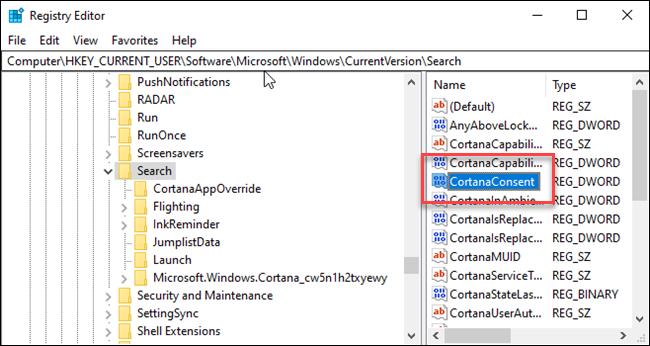
4. Below BingSearchEnabled, you should see CortanaConsent. Double-click this value to open its properties dialog. Change its “Value Data” box to “0”.
If you don’t see CortanaConsent, create it by following the same steps you used to create BingSearchEnabled.

Restart Explorer.Exe or PC and allgood