In the past, on Windows versions prior to 10, sending files from an Android phone to a PC was easy. All I had to do was select “Share,” then choose “Bluetooth,” followed by selecting the PC’s name. The PC would then prompt me to confirm the file transfer, and once confirmed, the transfer would begin.
However, when attempting to transfer files from my phone to my PC using Windows 10, the transfer is unsuccessful and quickly fails. I’m not sure if there is a new process for file transfer or if there are more complicated issues like driver problems.
2 Answers
Introduction
Transferring files from Android phones to Windows 10 is a common task that many people need to do. However, with the new Windows 10 operating system, the process may not be as straightforward as it used to be. In this blog post, we will discuss the different methods you can use to transfer files from your Android phone to Windows 10, including the traditional Bluetooth method and other alternatives.
Method 1: Using Bluetooth
The first method we will discuss is using Bluetooth to transfer files from your Android phone to Windows 10. This method has been used for many years and is still a popular choice for many users. However, as mentioned earlier, some users have reported issues with this method on Windows 10. Here are the steps to follow:
Step 1: Turn on Bluetooth on both your Android phone and Windows 10 PC.
Step 2: On your Android phone, navigate to the file you want to transfer and select “Share.”
Step 3: Select “Bluetooth” and then select your Windows 10 PC from the list of available devices.
Step 4: On your Windows 10 PC, a dialog box will appear asking if you want to receive the file. Select “Accept” to begin the transfer.
If you encounter any issues with this method, try the following troubleshooting steps:
– Make sure Bluetooth is turned on and discoverable on both devices.
– Make sure the devices are within range of each other.
– Try restarting both devices and attempting the transfer again.
– Check for any driver updates for your Bluetooth device on your Windows 10 PC.
Method 2: Using a USB Cable
Another method you can use to transfer files from your Android phone to Windows 10 is using a USB cable. This method is more reliable and faster than using Bluetooth, but it requires a physical connection between the two devices. Here are the steps to follow:
Step 1: Connect your Android phone to your Windows 10 PC using a USB cable.
Step 2: On your Android phone, select “File Transfer” or “MTP” mode.
Step 3: On your Windows 10 PC, navigate to “This PC” and select your Android phone from the list of devices.
Step 4: Navigate to the file you want to transfer and copy it to your Windows 10 PC.
If you encounter any issues with this method, try the following troubleshooting steps:
– Make sure the USB cable is securely connected to both devices.
– Make sure your Android phone is set to “File Transfer” or “MTP” mode.
– Check for any driver updates for your Android phone on your Windows 10 PC.
Method 3: Using OneDrive
If you have a Microsoft OneDrive account, you can use it to transfer files from your Android phone to Windows 10. OneDrive is a cloud storage service that allows you to store and access files from any device. Here are the steps to follow:
Step 1: Install the OneDrive app on your Android phone and sign in to your account.
Step 2: Upload the file you want to transfer to OneDrive.
Step 3: On your Windows 10 PC, navigate to the OneDrive website and sign in to your account.
Step 4: Download the file from OneDrive to your Windows 10 PC.
If you encounter any issues with this method, try the following troubleshooting steps:
– Make sure you have a stable internet connection on both devices.
– Make sure you have enough storage space on your OneDrive account.
– Check for any updates to the OneDrive app on your Android phone and your Windows 10 PC.
Method 4: Using Google Drive
Similar to OneDrive, Google Drive is a cloud storage service that allows you to transfer files from your Android phone to Windows 10. Here are the steps to follow:
Step 1: Install the Google Drive app on your Android phone and sign in to your account.
Step 2: Upload the file you want to transfer to Google Drive.
Step 3: On your Windows 10 PC, navigate to the Google Drive website and sign in to your account.
Step 4: Download the file from Google Drive to your Windows 10 PC.
If you encounter any issues with this method, try the following troubleshooting steps:
– Make sure you have a stable internet connection on both devices.
– Make sure you have enough storage space on your Google Drive account.
– Check for any updates to the Google Drive app on your Android phone and your Windows 10 PC.
Method 5: Using a Third-Party App
If none of the above methods work for you, you can try using a third-party app to transfer files from your Android phone to Windows 10. There are many apps available on the Google Play Store that allow you to transfer files wirelessly between devices. Here are some popular options:
– AirDroid
– Pushbullet
– Shareit
– Xender
These apps use Wi-Fi or mobile data to transfer files between devices, making them a convenient alternative to Bluetooth and USB cables. However, keep in mind that some of these apps may have limitations or require a paid subscription for full functionality.
Conclusion
Transferring files from Android phones to Windows 10 can be done using various methods, including Bluetooth, USB cables, cloud storage services, and third-party apps. While some users may experience issues with the traditional Bluetooth method, there are several alternatives available that are just as effective. Experiment with different methods to find the one that works best for you.
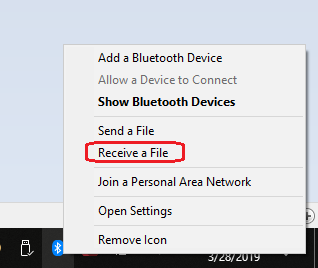
To receive Bluetooth files in Windows 10, I discovered that the first step is to right-click on the Bluetooth icon located on the taskbar. From there, I should choose the option “Receive a file”.

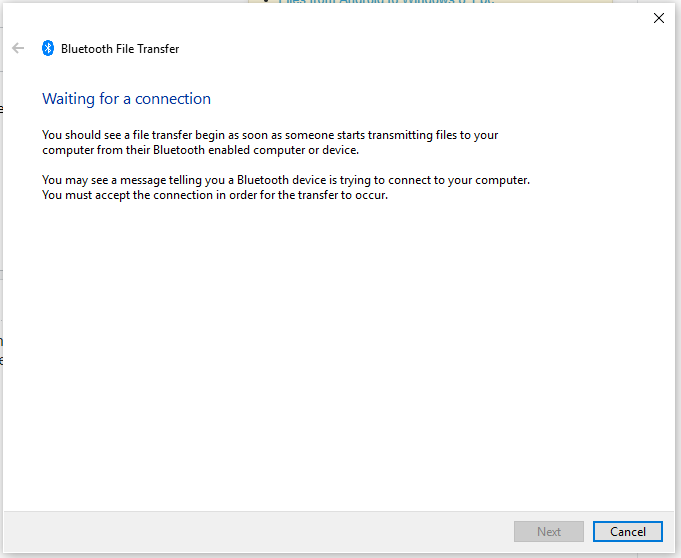
You will then see the following:

Once I have followed the steps to receive files on the computer, I can then proceed to send the file(s) from the phone, and the computer will be able to receive them.